
As the world has progressed, many technologies have joined the area, and many firms have developed them.
DJI, one of the top firms in this industry, chose to provide a model of drones with a first-person view after the success of the Phantom and Mavic series drones.
This is made possible by FPV goggles made specifically for these birds, which the users may wear on their eyes through the displays to see what the bird camera sees.
One of the most significant considerations for users when purchasing a drone is how to DJI FPV setup the drone.
As a result, in this part, we’ll provide you with a complete DJI FPV setup and a quick guide to DJI FPV setup guide, DJI FPV setup betaflight, DJI FPV long-range set up so that you can start flying with us.
How to DJI FPV setup?
After you’ve unboxed your DJI FPV drone, the first thing you’ll want to do is charge the device’s batteries.
In reality, the battery links all of the device’s parts to the charging hub, including the battery in your controller, goggles, and bird, and allows them to charge before you begin the DJI FPV setup procedure fully.
(This battery has a capacity of 2,000 mAh and a power output of 44.4 watts. Click for more information about dji fpv battery: fpv battery specs)
Connect the batteries to their respective devices once they have been charged. To make your bird ready to fly, you must first place all of the required components together.
Carefully and gently arrange the locusts, antennae on the goggles, and other items. Remove the camera cover and gimbal at this point.
Install the newest version of the DJI fly software on your phone next. It would be best if you now linked the goggles to a smartphone.
If your phone is an iPhone, you’ll need an OTG cable to perform this. Connect one end of the cable to the Type C connection on the bird goggles and the other to your phone. You are signing into your DJI account by doing so.
In the interim, you should ensure that your operating systems have been updated to the most recent versions. This can be done with the program’s aid, and you should ensure that the operating systems are up to date. In the next section, we’ll look at the other phases of the DJI FPV setup together.
DJI FPV setup guide
So far, we’ve discovered that the batteries should all be charged, the operating systems should be upgraded to the newest available version, and the DJI FPV application should be logged in; and we’ve done all of this, so the DJI FPV is ready to go.
So, let’s continue working on the DJI FPV setup together.
The following step is to activate your bird.
- First, replace the battery and then push the power button once; you should now be able to view the device’s battery level.
- Hit the power button once more and hold it for seconds to turn it on. Your bird becomes illuminated, and its locusts begin to spin.
- Then, in the same way, you turn on the bird, switch on the device’s remote control.
- To turn on the controller, first press the power key once, then hold the button for a few minutes the second time.
- After all of the devices have been switched on and the DJI fly program has been installed, you must link the devices to run DJI FPV.
The connection process is usually completed without issue by turning on the devices, and the bird, goggles, and controller are all linked and ready to use. If the device linking was not done correctly, you could use the tutorials to learn how to connect the devices correctly.
Your drone is now ready to take flight. Put the goggles on your eyes and use the remote controller to start the flight.
Important note: You will get a 2-day trial period if you purchase and install DJI Care Refresh with your drone. This period begins when you activate the drone and ends at the end of the second day. If you have any problems DJI FPV setup at this time, it will quickly repair it for you.
These drones have a maximum suspension time of 16 minutes, click: fpv review
DJI FPV setup betaflight
Betaflight is a flight control software used with drones, quadcopters, and similar devices.
Setting up OSD, also known as showing data, is one of the most critical aspects of starting the DJI FPV betaflight.
To do so:
- Connect your overhead unit’s TX and RX pins to an extra UART module (Universal Asynchronous Receiver/Transmitter). This module is positioned on the flight controller, and you can easily connect it to your desired devices.
- You can open the elements section and activate the Configuration / MSP option depending on which UART module the air unit is linked to. The Betaflight Configurator menu contains this feature.
Note: The only thing to remember here is to check which UART your air unit is connected to, then choose that one to make the following changes. It’s also worth noting that the remainder of the options in the settings must be deactivated.
After completing the steps mentioned above, it is time to set the required options.
For this job:
- First, enter the Configuration tab and then activate the OSD option that you see under the Other Features option.
- Also, enable the TELEMETRY option to allow its output port.
- Finally, select the display option on your glasses from the setting section, and then set the custom OSD to On.
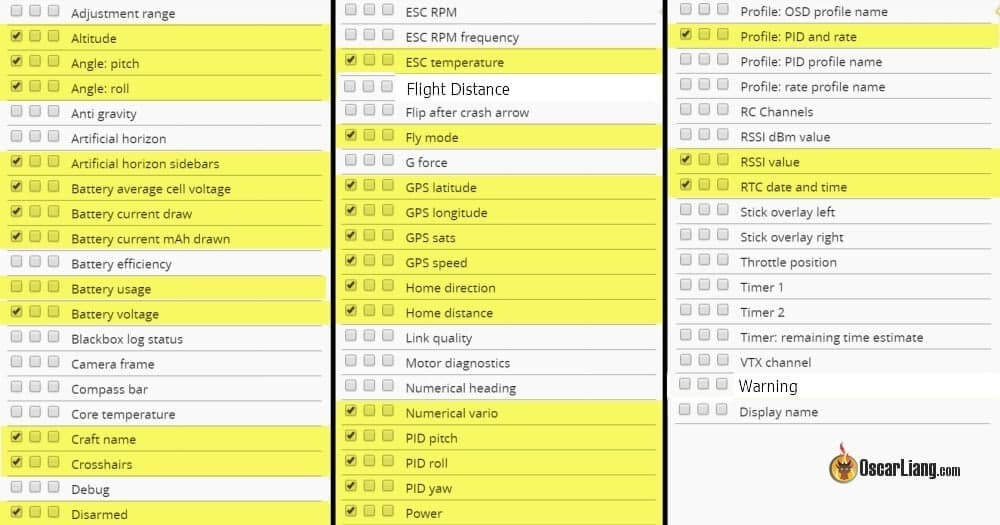
You can easily select the elements you want to display in the Betaflight OSD tab. Not all features are selectable, and not all are supported, but DJI is trying to support all betaflight items soon.
In the following, we have compiled a list of supported items for you:
DJI FPV long-range setup
DJI FPV long-range setup is another characteristic that allows you to fly your bird over greater distances. You might, for example, guide it to the top of the mountains or send it to a lake to look for something.
It is essential to know that you need to enable the home mode. The DJI FPV range equipped with Ocusync 3.0 technology is around 10 kilometers.
These birds can even take you on a 20-kilometer round journey. Changes should be made to various sections of the DJI FPV, such as the gear, frame, radio control connections, video connections, battery, OSD, GPS, and so on, so that this purpose may be readily accessed.
Finally,
As you can see, Drones have a unique role in both personal and professional life, and as a result, many firms have begun to create this technology.
DJI is one of these firms, and it is particularly well-known compared to others.
After purchasing these drones, one of the essential things to consider is how to DJI FPV setup and other components such as DJI FPV setup guide, DJI FPV setup betaflight, DJI FPV long range setup.
We attempted to clarify these methods in this post, and we hope you found it helpful.